Monday, December 31, 2012

Painting a room!

   As this blog shifts from bikes and beer to bikes and home improvements, you can expect to see more of this kind of post: Painting a room! ... now with more beer! We are in the process of painting the little guy's room, and here's the process. First off, I masked all the areas we didn't want to paint. Here are some tips that I learned:

1. Clean all surfaces before painting and taping
2. Use a low adhesive tape like blue painters tape
3. Make sure tape is firmly attached to keep paint from seeping behind it*
4. Take it off as soon as the paint is dry

*The tape did let paint seep behind it, and it was really frustrating to see little mistakes here and there. I think I should have used a stickier tape, and made sure it was sealed better before painting.

Masking the windows and corners

Next we took off the wall plates and light switch and stuff. Natalie working a screwdriver:

Funny that screwing is what made this room a necessity

And here's the room all blue! It's not a very overpowering blue, and has a little grey in it. It dried a little lighter than it was looking at first. I'm happy with the color, and especially happy with how it looks compared to the trees!

Like a blank canvas

   I first sketched the trees onto the wall with a pencil. Afterwards Natalie mentioned that chalk would have made for easier clean up. Next time! I had also read that people masked stuff like this off and then painted, but that sounded like a lot of work, so we're just painting it by hand:

Painters tools

Natalie hard at work

 And here's the final product! In the daytime you can really see the trees outside, which are also aspen trees, and it makes it look really nice!

Ta da!

Friday, December 28, 2012

Winter Biking Window

   Mountain biking in the winter can be a real hassle. There's the short days, the cold weather and snow. Enter the Winter Biking Window (WBW). This is when it's wet, or sloppy out and you still want to ride. The secret here is you ride when it the normally impassable mud is frozen.


The great thing about this is that you won't be tearing up the trail when it's muddy, you won't be making your bike a huge mess to clean after the ride either. So get out there and enjoy it!

"Should have waited for the freeze!"

Friday, December 21, 2012

Shelves, Shelves Shelves!

   Ongoing project: Garage has been making some serious headway. This was a two part project: One was hanging all these milk crates. I got all these at a yard sale and use them for storing various tools and parts. The second was replacing the existing shelves that use this terrible bracket system. The problem with the brackets is that they aren't terribly strong and they take up space I want to use for a tool board.

Shelves in place

   I am pretty happy with how easy these went up. And as Natalie can attest, I went full Geoff-level decision crisis trying to decide how exactly to hang them. 

Crates galore!

   Next came the other shelves. First I replaced the existing wood, which was some kind of MDF that was really heavy, with some lighter plywood. I also replaced the L brackets with a simple framing system. These were here when we moved in and they were terrible! The screws were barely long enough to reach through the drywall! Oh man these things were an accident waiting to happen. Anyways, took it all down:

Lousy shelves!

Framing out the new shelves

   All done and mounted and packed with stuff! One of the nice things is that I screwed the shelf onto the frame. This acts like a monocoque, giving the whole thing a lot of strength  I can climb up on these.

Sweet, sweet organization

So far we have: 
- Shelves

Last part is to take my tools out of the boxes they were in and hang them up in some useful manor. Here I had the boards laid out to figure how the tools would be organized. You can also see the light I hung under the shelf to work by.

Like a blank canvas

The space is about 8' x 3', which is a lot more room than the old tool board. I next laid out all the tools I wanted to hang and marked where the hanging nail would go with a sharpie.

Tools laid out flat

After hammering in all the nails, I screwed the boards to the wall and begun hanging up the my tools. I'm really happy with the increased space, everything isn't as tight and there's room for even more tools! Yeah!


That's everything from this (lengthy) update! 


Thursday, December 20, 2012

Updating the CX (...update)

   Mother nature obliged me with a chance to see how the new ride handles the elements! While my brother-in-law is regaling me tales of temperatures in the 60's in South Carolina, I was fumbling for the middle finger emoticon button through thick gloves. 

Take the picture, then run inside and warm up!

Everything runs smoothly. I have been running a slightly lower tire pressure in the cold. It helps a lot with traction! Other than that, snow be damned! Get out and ride your bike!*

*this was largely miserable and I DO NOT condone riding in the snow unless necessary. 

Tuesday, December 18, 2012

Updating the CX

   A while back I swapped out my Schwinn cross bike for a Cannondale via a Craigslist deal. I like the new bike a lot better - it fits better and has disc brakes. Anyway, it had an older 105 9 speed build on it, and I fancy a fancy new ten speed group. I took some time and bought the parts needed, but they're all here so let's begin! 
   
Cassettes

   I needed to replace a lot of parts to make the switch to 10 speed. The obvious parts were the 5700 105 shifters and a 6700 Ultegra derailleur. The not so obvious parts were the cassette, chain, handlebars, stem and all the cables. 
   One of the best things about this set up is hoods. The new(ish) system from Shimano has a much flatter and more comfortable place to grab.

Comparing the hoods

   The 5700 shifters are set up so the cables run under the bars, unlike the old system where they went between the hoods. This is why the cables had to be replaced; the old ones were too short to reach the derailleurs.

Cable routing

   Getting the cables into the hoods took forever! I had to look up the instructions on the Google. After some poking around I was able to get the cables in the right place.


Slick!

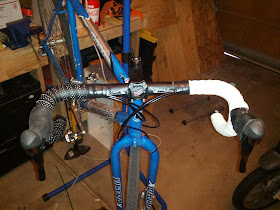
Once the housing was in place, the cables and housing on the handlebars looked like a circus. 


What a mess!

   Little electrical tape cleaned up everything nicely. The new handlebars are a little wider and oversized and should be more comfortable for my manly frame. This also required a new stem to clamp on the oversized handlebars:

Standard width          (front)           Oversize width

Electrical tape is sure handy, and it's stretchy nature makes it work really well for both taping down the cables and finishing off the bar tape. Here are the cables restrained by the tape like a dog on a leash

Ta da.

   Finally, I wrapped the bars with two sets of bar tape. I like wrapping cork tape under Fizik tape for a slightly larger and softer for my saussagey hands.


Almost done!

And that's it! The bike is a bit lighter and far more comfortable. I was fortunate that I had the stem, handlebars and seat, and only had to buy a few parts. Final conclusion: This bike is freakin' awesome!


Friday, December 14, 2012

Friday Horse of the Day

The people in the background are so happy!


Tuesday, December 11, 2012

Rolling Workbench

 In the never ending quest to organize our new place, I have been working on some fun ways to make the garage space efficient and usable. A few weeks ago in this post I wrote about the workbench and cubbies we put in. This rolling workbench goes at the end of it. Here's the layout:

Pretty straightforward!

I started by building a couple square frames the depth of the bench and 36" wide:

Upside down

The floor is nice and flat so I used it with a large framing square to make sure everything was nice and straight. Pre-drilling all the holes was an important step in keeping the wood from splitting. Once I had the legs on, it was starting to take more shape:


Ready to flip

The top work surface went on pretty slick, but the bottom had to have some notches cut out of it to fit around the legs:

Notched corners

The bottom shelf serves two purposes: It is additional storage as well as provides a lot of stability to the whole structure. And here it is in place! 

All done

Last thing was to put wheels on the bottom so it can roll around easily. It was built for about 5 minutes and already being used! 

Monday, December 10, 2012

Results are in!

Well, Friday was an exciting day! we found out that...


Oops, camera was facing the wrong direction...


There we go, we are having a boy! We also had a nice long ultrasound and saw that the little guy is developing in the 48th percentile for normal, which is great news. The Dr even said that he looked like he was pedaling in place. He takes after his dad! All right!


Thursday, December 6, 2012

What Shirt Will I Be Wearing Tomorrow???

Tomorrow is a big day! Natalie and I have a doctors appointment to find out if we're having a boy or a girl! Of course we both are so excited it doesn't matter which it is, just as long as they like cooking, bikes, dogs, tools, crafts, Futurama, kitchen gadgets and Halloween. 

Dressing appropriately

So which outfit will I be sporting tomorrow night? Stay tuned!


Wednesday, December 5, 2012

(re) Hanging up Bikes in the Garage

   In the seemingly never ending battle of organization in our new house, the garage is one place I've been working hard on! I had the bikes hung up on the studs, but that wasted some space. I screwed a 2" x 4" x 10' to the ceiling and then was able to put bikes 12" apart. This way the bike spacing is nice and tight but they're not on top of each other. Here it is with no bikes up:

The new style

My 29er mountain bike is noticeably longer than my other bikes so it got it's own hook at a longer wheelbase:

For the longer bikes

That's about it, now everything can be hung up, including the dog trailer. It looks kind of like a buffet of bicycles, which I LOVE SEEING. 

All done!

Hanging them like this is both efficient and safe for the bikes. Best part is that with them hung by both wheels I can walk under without throttling my gourd. 

Monday, December 3, 2012

WITCHCRAFT! The Two Wheel Drive Mountain Bike

I've been siting on this post for a while! thatswhateshesaid.jpg So at Interbike there was a whole pile of new and emerging technologies. One of the cooler ones I read about was this to wheel drive bicycle. Two wheel drive technology, so far, has relied on a worm drive to get power to the front wheel:

Aftermarket device and front wheel

The issue with this is that worm drives are a lot like shaft drive: not terribly efficient and perform poorly under a lot of torque. They're good for a motorcycle or something where it can be robustly constructed and forces don't have to turn a lot of corners. On a bicycle, however, weight is more important! Enter Tretta. They use a series of chains and a bendy transfer drive under the headset. Check it:

4 chains is right!

So this system relies on the existing technology, just more of it. I like that idea. To wrap your head around it you really have to see it from several angles.

The complex fork

Turning in action

Turning from behind

The thing right under the headset is the coolest piece, dealing with the transfer of power around the steering mechanism. I imagine there's some linkage under the black rubber boot. I couldn't find any information on that, but I assure - it's unnatural.